Get Started Guide: Worker Node Operators

Got a lot of work to do and want to get down to business? Click here to go straight to the how-to guide.
Subsquid is a decentralized data access layer that unlocks granular, permissionless data access at a petabyte scale for developers, analysts, and researchers. Subsquid’s role in Web3 is comparable to how Google unlocked Web2 by accumulating the whole of Web data and making it queryable. However, there are fundamental and notable differences:
- The establishment of a credibly neutral access layer with a lean, simple low-level interface to consume the data is key to programmatic adoption (think HTTP protocol).
- The value of Web3 data increases exponentially when it is not fragmented, cementing the network effect.
The value-per-byte of on-chain and Web3 data is orders of magnitude higher than in Web2, and is consumed by smart contracts, indexers, analytics APIs, and edge technologies like AI agents.
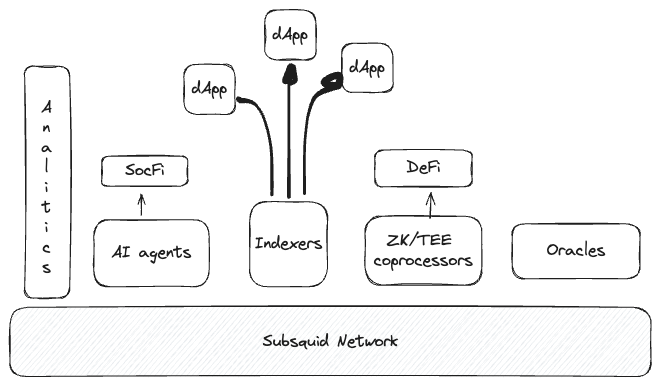
The Subsquid Modular Stack
Very simply put, Subsquid comprises a modular stack which includes a decentralized data lake, a decentralized query engine, and developer tools to build on it. The data lake holds all the blockchain data. To get data from the data lake, users write queries, which are answered by worker nodes. As the name suggests, these nodes ‘work’ to respond to the query and retrieve the requisite data. Workers are incentivized to do so through network rewards in the form of SQD tokens.
However, in this system there needs to be a trustless way to curate the best behaving and most performant worker nodes. This is the role of delegators.
Worker Node Operators
A worker node in the Subsquid network is responsible for storing and serving chunks of blockchain data to network clients. An essential component of the network, worker nodes ensure the accessibility and integrity of blockchain data.
When a user sends a query to the network, the scheduler finds the worker with desired data using libp2p discovery algorithm. After that, the node sends a response to the user. This setup ensures that the Subsquid network is fast and decentralized as data is efficiently distributed among the workers.
We aim to build a permissionless system. Thus, anyone can run a node. But what are the benefits of being a node runner?
As a node runner, you’re a key component of the Subsquid network, who provides data to network clients. For running a node you’ll be rewarded for your efforts with SQD tokens. Node runners receive the highest APR of all the network participants. In the future, there might be further rights attached to being a node runner.
To get started, make sure that your setup satisfies the following hardware requirements:
- To run a single worker you will need:
- 4 vCPU
- 8GB RAM
- 1TB SSD
- public IP and one port open for incoming TCP traffic (default is 12345, but can be changed)
- 100_000 tSQD tokens
- Some ETH on Arbitrum for gas
How to Run a Worker Node
There are two options to run the worker. The first one is using Docker. Alternatively, you can run it from source. Please refer to this wiki for more in depth instructions.
To run a worker, follow these steps:
- First, pick a location for the worker data. It should be able to accommodate at least 1Tb. Do not create the data folder manually, just find a place for it.
- Pick a location for your Subsquid Network key file. The location must be outside of the data directory.
- Create a new directory for installation files and save the setup_worker.sh script in it:
- curl -f O https://cdn.subsquid.io/worker/setup_worker.sh
- Make the script executable:
- chmod +x ./setup_worker.sh
- Run the setup script. Supply the data directory path and the key path to it:
- ./setup_worker.sh <DATA_DIR_PATH> <KEY_PATH>
- The script will prompt for your public IP address and the UDP port for P2P communication. It will create necessary directories, generate key files, and download configuration files.Here's what it does:
- creates a directory at <DATA_DIR_PATH>
- generates a key file at <KEY_PATH>
- generates a .env file in the current directory and populates it with reasonable defaults
- downloads a .mainnet.env file
- downloads a docker-compose.yaml file for running prebuilt worker images
- The last line of the script's output should look like this:
- Your peer ID is: 12D3KooWPfotj6qQapKeWg4RZysUjEeswLEpiSjgv16LgNTyYFTW. Now you can register it on chain.
- Copy your peer ID, as it will be needed for on-chain worker registration.
- (optional) Feel free to edit the generated .env and .mainnet.env files if you'd like, e.g., to set a custom Prometheus port or use your own RPC provider.
Register your Worker
Before you run a worker node and start collecting rewards, you need to register it on-chain using our web application. Here are the steps to do this:
- Go to https://network.subsquid.io.
- Fill out the form and submit it by signing a transaction:
- In the top drop-down menu, choose either "Wallet" (to use SQDs from your wallet directly) or "Vesting" (to use SQDs from a vesting contract).
- Use the peer ID you copied in step 4 of Configuring your setup.
- Go to the "Workers" tab and wait until the status of the registered worker changes to "Offline" or "Active". Since the workers can only be activated at the beginning of an epoch, you may have to wait for a few minutes.
Go to the Workers tab and press the "Add Worker" button. You should see a worker registration form:
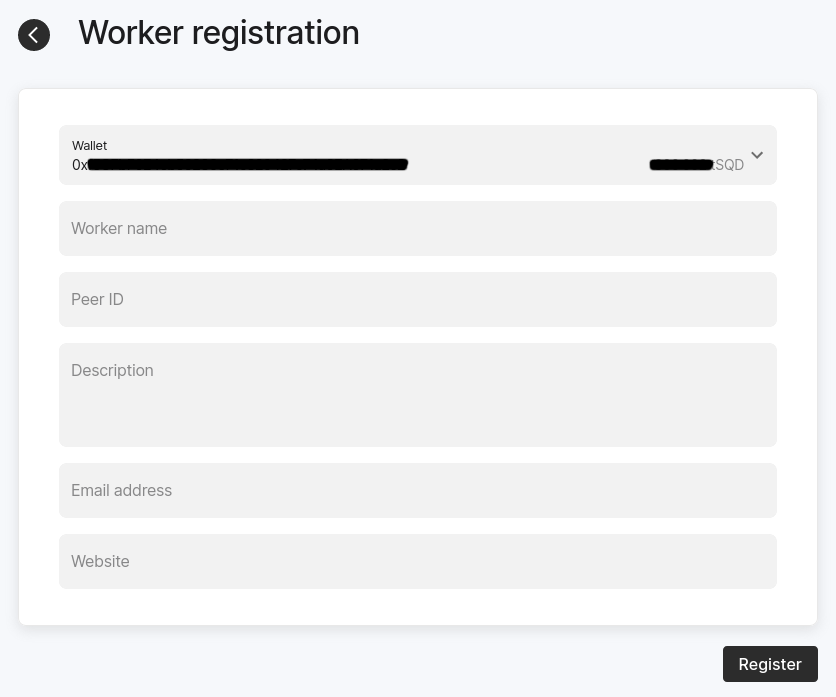
Connect your Primary Wallet.

Make sure you're still in the folder where you executed setup_worker.sh during configuration before proceeding.
Now, you are ready to start the worker. There are two primary options to run the worker node: using Docker or building from the source.
Using a pre-built Docker image
Open the terminal and run:
docker compose up -d
Then find the worker container in the output of docker container ls and check its logs with docker logs -f <worker_container_id>. After some time the worker should output some info on the downloaded data chunks.
Building from the source
- Install prerequisites (Rust, Git, Protobuf, etc), e.g. with
apt install curl git build-essential pkg-config protobuf-compiler libssl-dev libsqlite3-dev
- curl --proto '=https' --tlsv1.2 -sSf https://sh.rustup.rs | sh
- Load the config generated during the setup.
source .mainnet.env
- source .env
- Clone the worker repo.
- git clone --depth 1 --branch v1.0.0 https://github.com/subsquid/worker-rs.git
- This may take a few minutes.
- Build the worker.
cd worker-rs
- cargo build --release
- Run the worker using the command below.
- nohup cargo run --release – --port $PROMETHEUS_PORT p2p
- After some time the worker should start downloading data and serving queries
After the process is complete, you can monitor your worker status and rewards in the Network app.
For a more in-depth explanation of what we’re up to at Subsquid, check out the Whitepaper.